Thursday, March 19, 2009

Now we are really having a Blast!

As we mentioned before, we are almost ready to paint the buggy.  We wanted to have it sandblasted before priming it though to get some of the welding slag and surface rust off the steel.  Ultimately, we ended up having it media blasted today which is apparently very similar to sand blasting except with a different media.  The media choices are sand, crushed-recycled glass, walnut shells, baking soda, crushed corn cobs, and various other types of ingredients with varying grits and hardness.  We chose soda.  No, not Coca-cola, but baking soda! It is environmentally friendly and because it is a finer grit, we were able to do some aluminum pieces as well.  It can also be sprayed with a little water so it keeps dust to a minimum and keeps everything nice and cool.  We found a local company that comes right out to the house and does all the dirty work.  Don't worry, Elwood still supervised the event to make sure everyone did a good job.  The next step now is to prime and paint the steel.  We have a short window of time with which to do this before the good old Florida humidity starts to rust the steel again.  Here are a few photos we took of the SodaBlasting today.
  
A plug for Blast All, the company who did all the work.  A little trivia the man told us, this type of cleaning was invented in 1972 for cleaning the Statue of Liberty.  Apparently you can clean copper the same way!

 
The equipment...we don'mess around!

 The buggy is ready.
We removed the front end and wheels because we already painted it back when we took it off the donor car.

      
                                                        The "Supervisor"

          About to be chased 
                             by the Soda Cloud

     
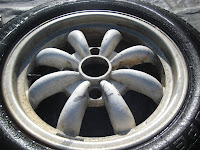
The before and after wheels.  What a difference! 
We aren't using these wheels on this buggy.  
Hopefully we can use them when we build 
Jen's "Barbie Beach Cruiser" someday which 
will of course be all pink!

 He was pleased with the work.


After about an hour and a half, 
our leader was getting tired and bored.

 "C'mon already!"

All clean and back in the garage...


Tuesday, March 10, 2009

Dune Buggy 2009 Update

Well it has certainly been a while since we blogged about the dune buggy progress but have no fear, the project rolls along.  We have decided that at long last the buggy need not be naked anymore, and it is time for some paint.  We think we have decided where everything is going to go such as seats, mirrors, lights, etc and have completed all the appropriate welding for those items.  The next step is then, to paint it.  We have decided to paint it red to optimize visibility since it lacks a body.  We have also chosen to use bed liner paint used in truck beds for extra durability.  We have ordered the paint but there is a little prep work involved before we can actually paint the buggy.  Our project this week was to remove everything from the buggy we had spent the last year building.  That's right.  Take it all apart!  I have to say, it was a little disheartening to realize that a year's worth of work could essentially be "undone" in a matter of two afternoons.  Oh well.  We did it and now we are on to the fun part...Painting!  Here of some photos of the "demo" we did before painting.

                         
Jen, taking out the center and dash consoles


 The "naked" buggy in the driveway

    
We decided to flip it over to take off the floor


God-willing this is the last time the buggy is in this position!

             Floor all gone

          
 That is not an illusion, the buggy frame is bigger than my car!

 Stripped down to it's frame 
  
 The floor pan. We are painting it black with 
the same kind of paint.

Next, we will put everything back on, hopefully not have too many left over pieces, wire everything, install motor, and cruise.  We have also purchased the new wheels for the finished product but are still in search of the perfect tires tires for them (in other words, cheapest).

Friday, August 22, 2008

I know, I know. I have some splaning to do!

Well clearly it is time for a dune buggy update!  I will admit that progress has slowed a bit since my work schedule got a little hairy but we are still focused and still doing small things to make progress.  We were held up for about a month and a half waiting for parts to arrive. Now we have all the pieces we have been waiting for and are getting on to the install.  Most recently we have acquired a center console with a key to serve as our center console/glove box/trunk. It is installed, waterproof and ready for a stereo.  We installed the steering wheel and driver's seat.  The seat ended up eventually being put on a track so that it is adjustable.  As you know, Steve and I are not exactly the same height so we needed that to be adjustable if I ever had a hope of driving.  We installed the headlight casings, the fuel tank and temporarily mounted the gear shift.  Steve fashioned the windshield frame so that it will bolt to that eventually.  Oh and we also have seat belts!  Here are some photos of the progress.

              The steering wheel, center console and seat

The fuel tank.  
   
                                   The "headlights" and turn signals


The long awaited pedals.  (the brake has two master cylinders.  I'm told for added safety)

Another view of all three pedals.
       
                       
                   This is the clutch slave cylinder.  
                               More to come on that!

These are our Marine gauges.  

                              
Yesterday we drove to an airboat store in Inverness to pick them up.

             Steve bought a piece of steel on the way home to mount the gauges.


Steve's new toy.  A drill press.  For making the gauge-sized cut outs in the steel.

Another handy tool used in this project!


The finished project from yesterday's adventure.  See my blog for all the details on that one.  

We are still having fun with the project.  I know it looks like we quit altogether but we didn't. Just haven't been as faithful with updating the blog as we should.  We are starting to get to the point on the project where the steel tubing and floor are starting to rust due to being untreated. We are planning to tackle "plumbing", electric and paint next.  In order to paint, we we be dismantling everything we have put together so far, including the floor.  We decided on a bedliner paint for extra durability.  It is a paint that has texture so that it won't chip quite as easily.  I think we are doing black on the floor and red on the frame. That will hopefully make us more visible on the highway.  We have also toyed with the idea of LED lights along the tubing for extra visibility at night.  We'll see when it comes down to that.  Can't wait to keep plugging along!

Tuesday, May 13, 2008

The First Light of Day...

For the first time today, we put tires on the dune buggy frame and pushed it out into the driveway. This presented an opportunity for photos:
Slowly, the frame of a car escapes the garage into the bright light of day...

   
So, the little wheels and tires look kinda silly, but you get the general idea. We spent some time playing with the steering to ensure that no part of the frame interferes with the travel of the front wheels and mechanism. Sadly, there was more than one problem that required some attention. We needed to cut out a few 'accessory' pieces, trim them and weld them back in. Not a big deal, but I'm glad we checked!!! Next, we pushed it back into the garage and measured for the floor. There's still quite a bit of welding to be finished on the frame plus the great big huge pile of work that comes after that, but I'll admit that there was a certain boost that came from pushing this thing into the driveway...

Wednesday, May 7, 2008

Totally Tubular: catching up with the Dune Buggy!

We have made so much progress this week it's not even funny.  Probably too much to write about in just one blog but here it goes anyway.  Our progress began when Steve was able to finish prepping the rear suspension/trans-axel. Here is what it looked like a week ago.  

 Steve, cleaning up his welds.

 The finished suspension

 Another view.

But we're not finished yet, oh no.  Last night when we got home from work, we got ambitious. We decided to start tack-welding the frame pieces together.  We received the floor of the frame tacked together along with 68 other pieces of steel left for us to assemble like a puzzle.  All the pieces were pre-cut and measured.  The instructions were pretty easy to follow so we gave it a go.

 Elwood donated one of his "tools".
   
 
Putting on the arm rails on the sides
    
 Arm rails, front and rear suspension in tact.

We decided to attempt one more task before calling it a night.  We needed to place the rear roll bar in place because everything else gets placed off of it.  We had to get the angles just right so that every other piece down the line would line up properly.  After about three attempts, we had some success.

 Rear roll bar in place

 
Our shop foreman approved of the work

 Me, trying it on for size.

This morning we got started right away.  We needed to assemble the rest of the roll bars, the back end, the side supports and the tree rails.  Here are some photos of the transformation.

 Side rail supports

 
The two rear roll bars and the rear engine hoop

 The back bars

 A different angle

 The front "windshield" and "roof"

 The first "test drive"

 At this point, we ran out of nuts and bolts and had to make a trip to Lowe's.

  Rear engine braces

 Profile of rear

 Rear and side tacked together!

 Steve, welding a support brace

 Lot's of welding...

 Front chasis support brace

 The triple bend tree bars

 These babies were tough to install

The next step is to finish weld everything together so that it is as strong as it is going to get. Unfortunately, we ran out of wire for the welder so the rest of that will wait until tomorrow. Then we will be able to put the tires and wheels back on and have a rolling chasis.  Steve has his work cut out for him tomorrow!